DTU(Data Transfer Unit)是专门用于将来自于设备端的串口数据通过无线通信网络传送至 IoT 平台的无线终端设备。
本文档列出了 EG912U DTU 所需的硬件资源和相关文档。
型号:EG912U 核心板
开发板文档: EG912U 核心板产品规格书及用户指导手册
QCOM - 串口调试工具
VSCode - 代码编辑器
固件版本: QPY_OCPU_BETA0002_EG912U_GLAA_FW
版本:v1.0.0
从 Github 仓库获取源代码步骤如下:
工程配置文件路径:code/dtu_config.json。
基于 TCP 私有服务器数据透传做如下配置:
打开 TCP 服务器 :http://tt.ai-thinker.com:8000/ttcloud
默认system_config.cloud配置项定义为"tcp"即 TCP 透传模式,系统会自行读取socket_private_cloud_config配置项。
本实验采用 TCP 透传模式,用户需根据实际情况设置socket_private_cloud_config配置项中的 TCP 服务器域名(domain)和端口(port)。
uart_config配置项是串口配置参数,默认是根据当前实验开发板做的配置,不可更改。如用户采用其他开发板则需要根据实际硬件进行配置。
完整配置文件模版如下:
参数说明:
system_config.config: 指定当前使用的私有云类型。目前支持TCP和MQTT。mqtt_private_cloud_config: MQTT私有云配置。socket_private_cloud_config: tcp私有云配置。uart_config:串口参数配置。下载安装QPYCom工具后,使用该工具下载脚本至 QuecPython 模组。
💡Tips
QPYCom 安装和使用教程 :https://developer.quectel.com/doc/quecpython/Application_guide/zh/dev-tools/QPYcom/index.html
程序运行后,在 REPL 交互页面可以看到日志输出如下图所示。
左侧图示,使用 QCOM 模拟 MCU 打开用于透传的模组串口(即 USB 转 TTL 模块对应的 COM 口)。
右侧图示,REPL 交互口输出的模组日志。
使用串口工具 QCOM 模拟 MCU 串口上行数据,通过 DTU 透传至 TCP 回显服务器,再由回显服务器将相同数据通过 DTU 下行透传至 QCOM。
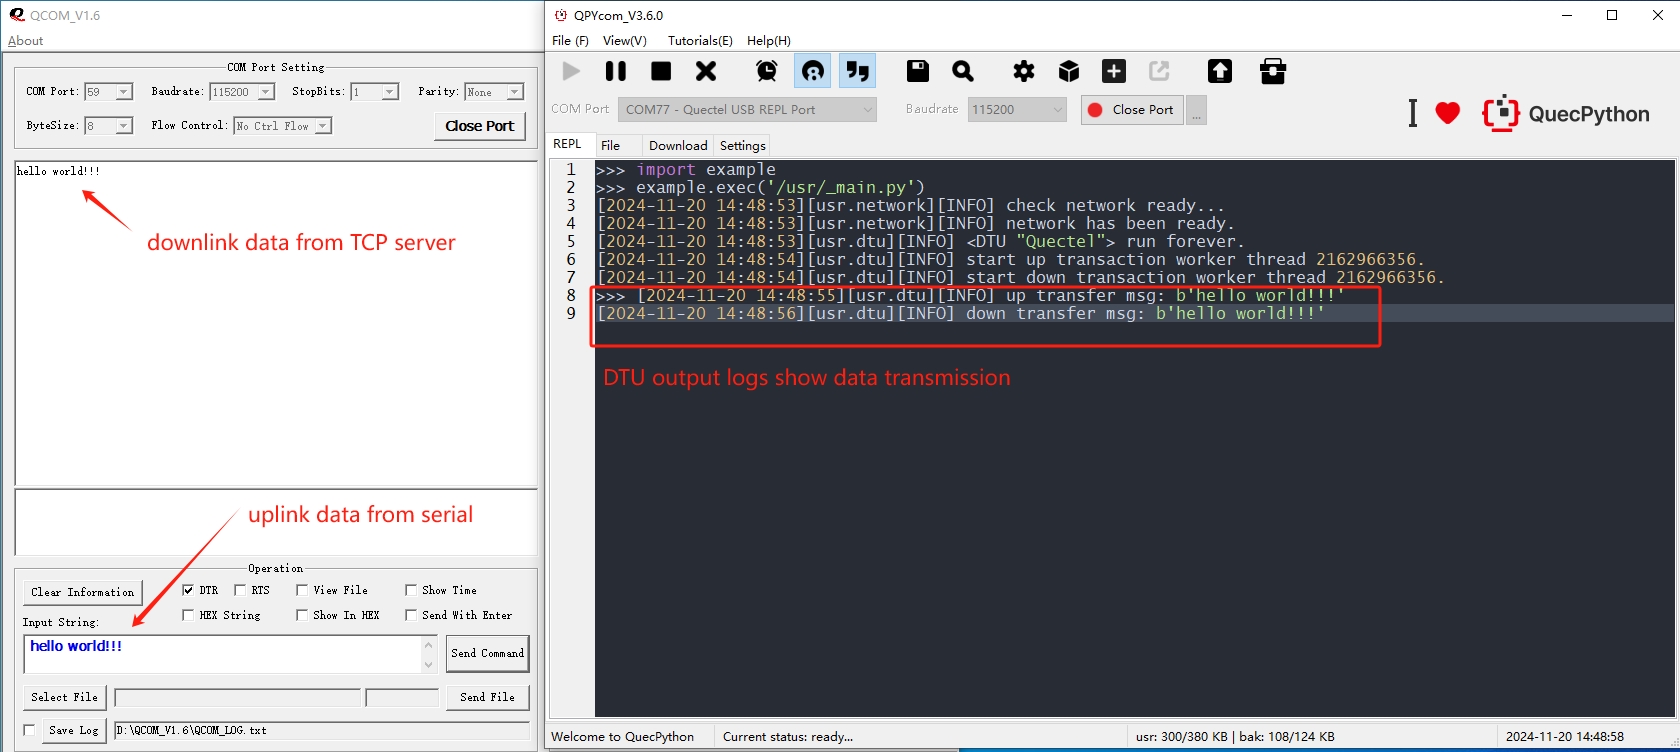
该案例中采用的是 TCP 回显服务器,所以 QCOM 上行数据,经过 DTU 透传至 TCP 服务器接收到之后会立即按原路径下行。
工程配置文件路径:code/dtu_config.json。
基于 TCP 私有服务器数据透传做如下配置:
默认 system_config.cloud 配置项定义为 "tcp" 即 TCP 透传模式,系统会自行读取 socket_private_cloud_config 配置项。 此处改为 mqtt 协议模式。
本实验采用 MQTT 透传模式,用户需根据实际情况设置 mqtt_private_cloud_config 配置项中的 MQTT 服务器域名(server)、端口(port)、客户端id(client_id)以及订阅和发布主题等参数,如下。
uart_config 配置项是串口配置参数,默认是根据当前实验开发板做的配置,不可更改。如用户采用其他开发板则需要根据实际硬件进行配置。
完整配置文件模版如下:
参数说明:
system_config.config:指定当前使用的私有云类型。目前支持tcp和mqtt。mqtt_private_cloud_config: MQTT私有云配置。socket_private_cloud_config: tcp私有云配置。uart_config:串口参数配置。下载安装 QPYCom 工具后,使用该工具下载脚本至 QuecPython 模组。
💡 Tips
QPYCom 安装和使用教程:https://developer.quectel.com/doc/quecpython/Application_guide/zh/dev-tools/QPYcom/index.html
查看 REPL 交互口日志
程序运行后,在 REPL 交互页面可以看到日志输出如下图所示。 DTU服务中有2个线程处理数据,一个是用于检测读取串口数据并转发数据给云端,一个是检测云端下行数据透传给串口,如下图所示。 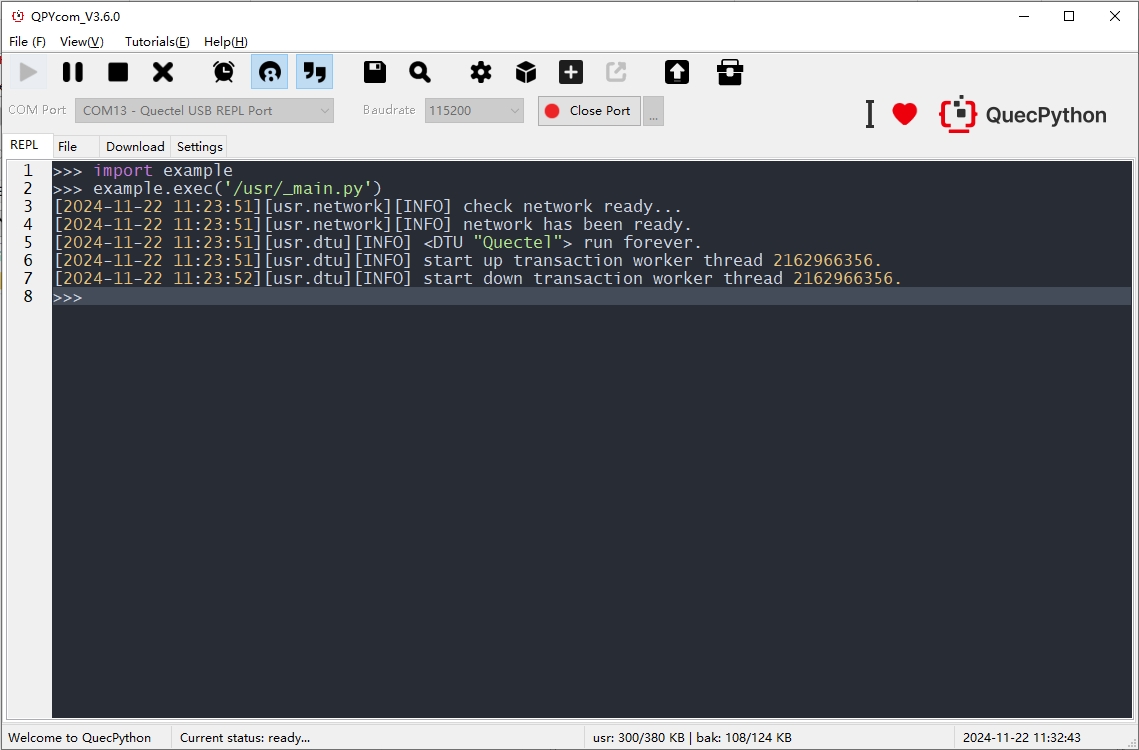
上行数据透传
使用串口调试工具模拟mcu给模组发送上行数据。
Input String输入框中输入hello world!字符串。Send Command按钮通过串口发送数据。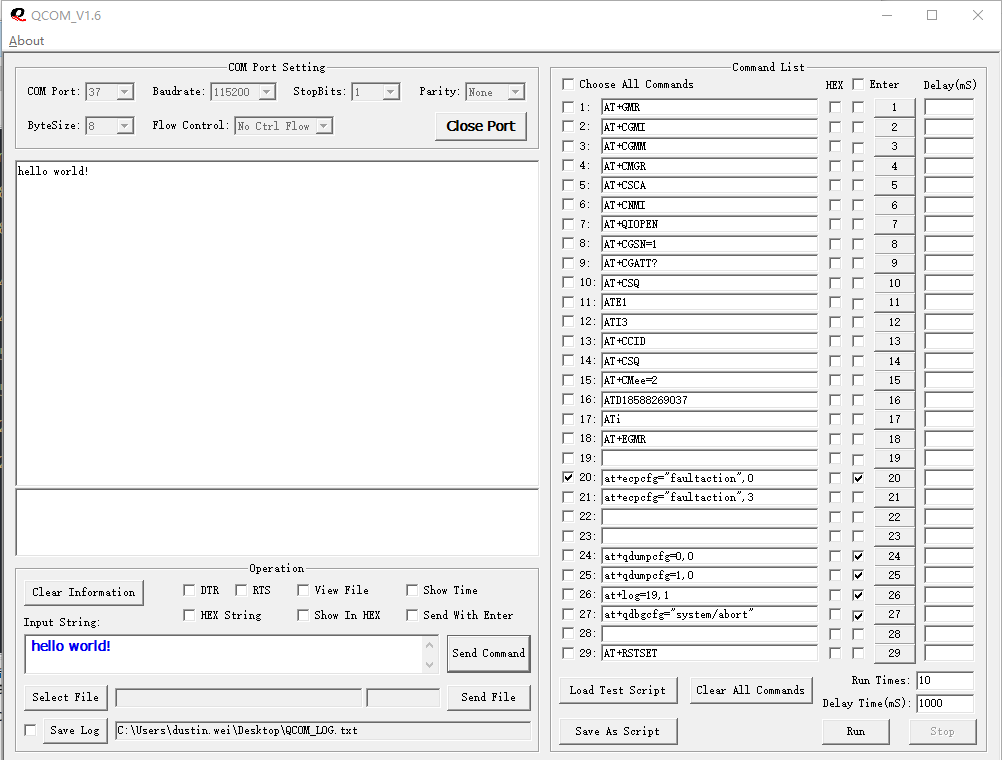
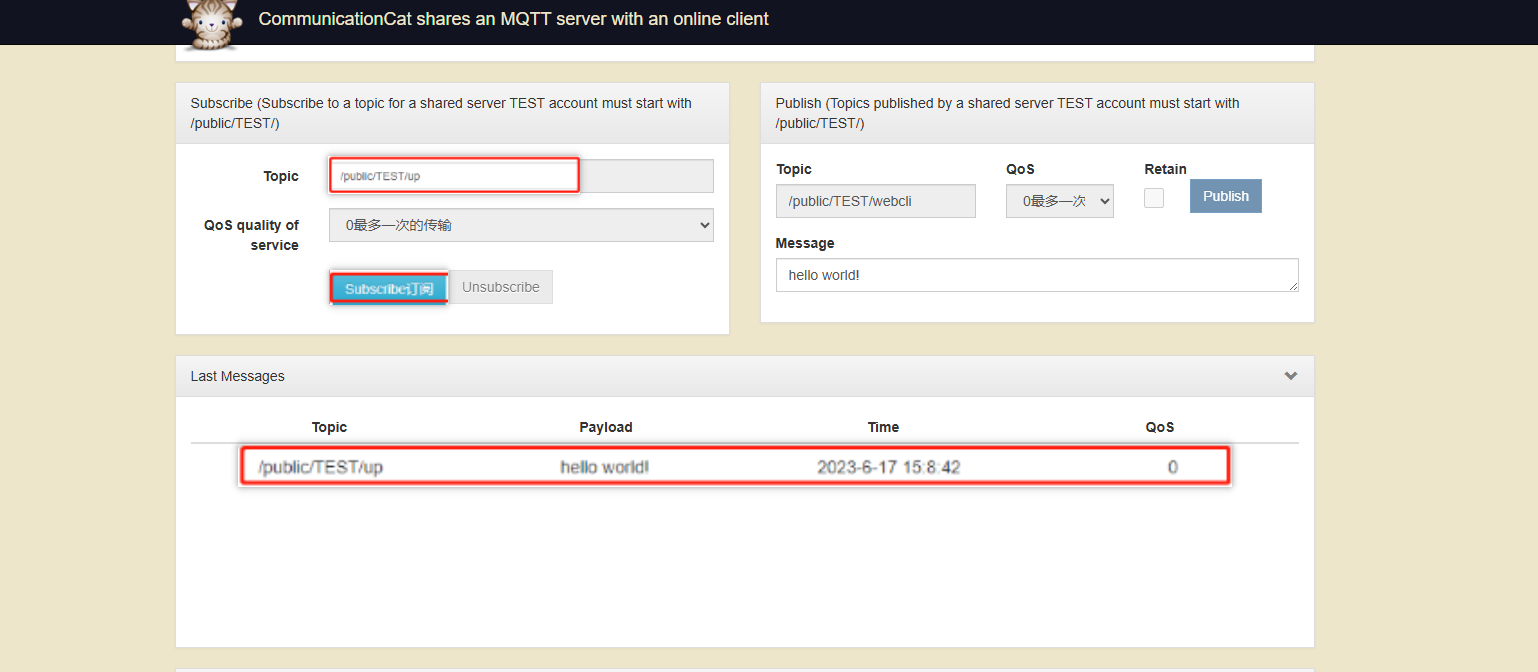
DTU接收串口数据,直接透传至mqtt云端。
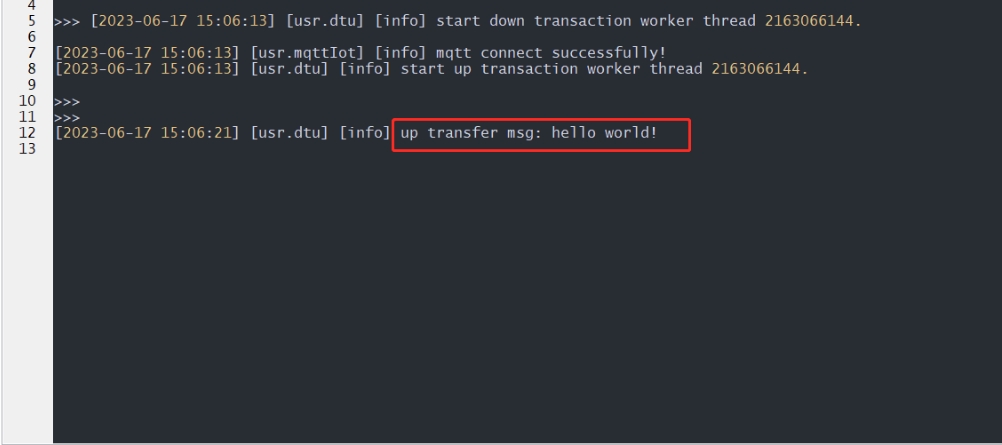
云端接收上行数据日志。
注意:通信猫云平台仅用于测试,可根据实际需要更换云平台
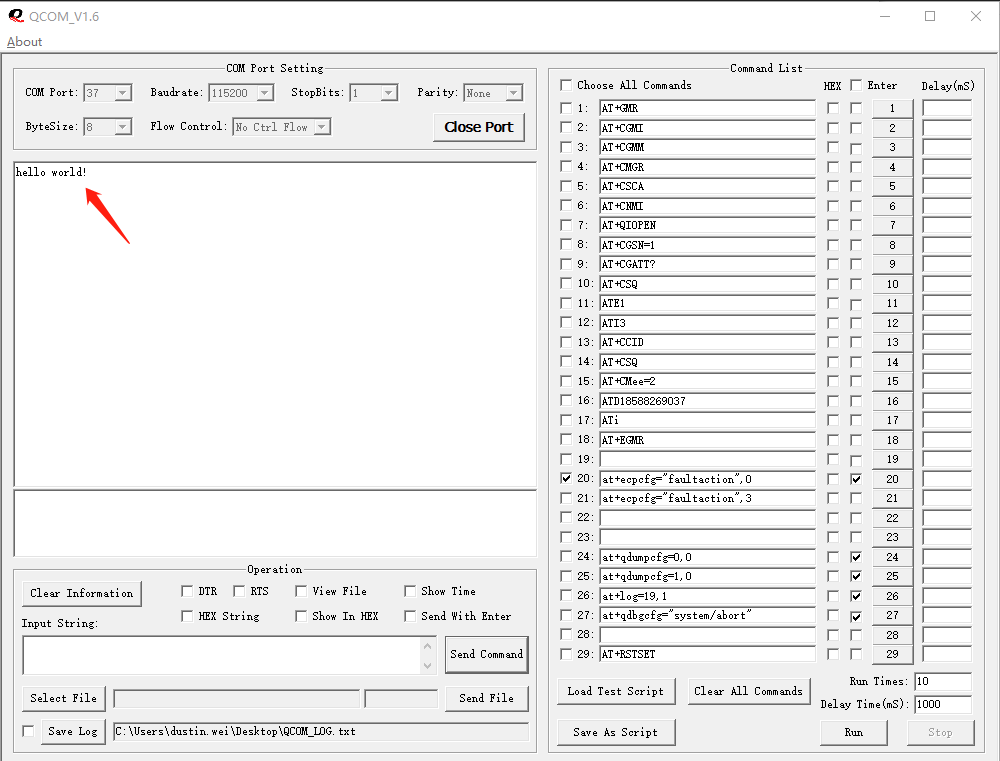
下行数据透传
云端发送下行数据。
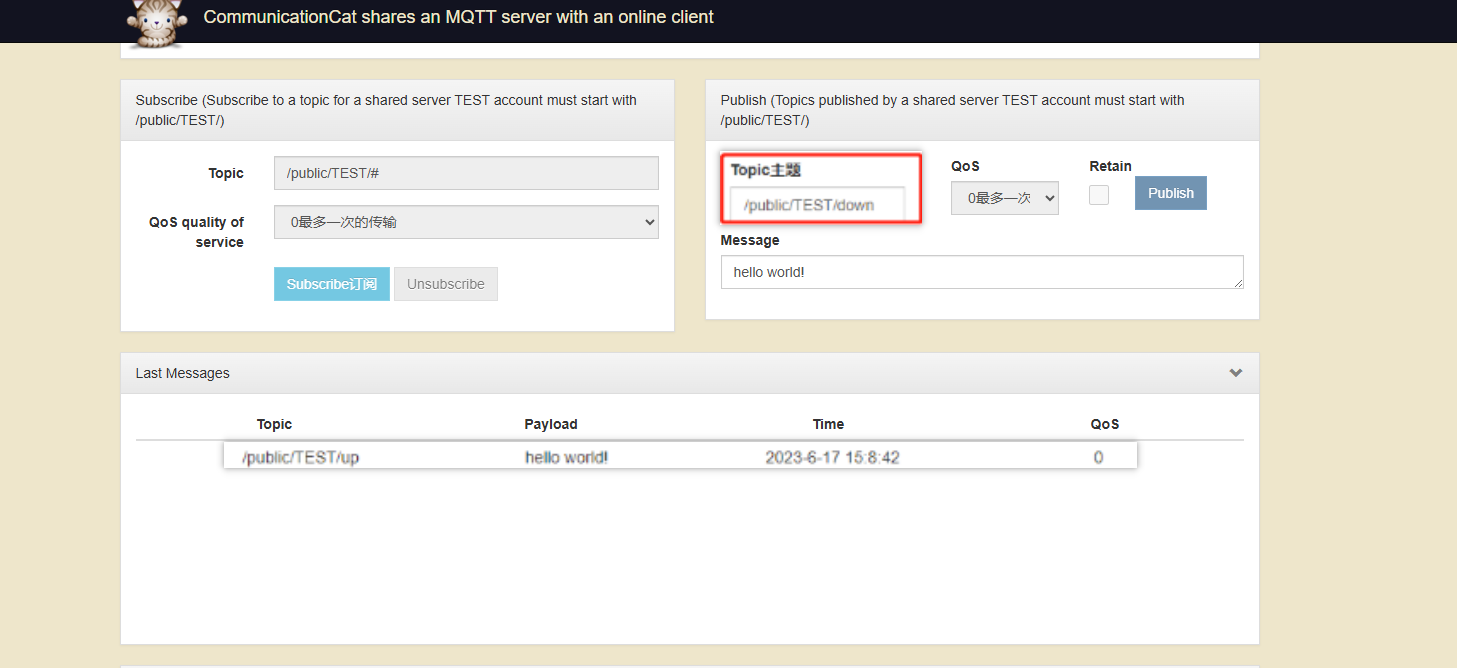
使用QCOM观察串行调试工具,模拟mcu接收模块下行数据。
一般了解一个程序代码大多从启动部分开始,这里也采取这种方式,先寻找程序的启动源头。本例程,一般的程序启动顺序如下图所示:
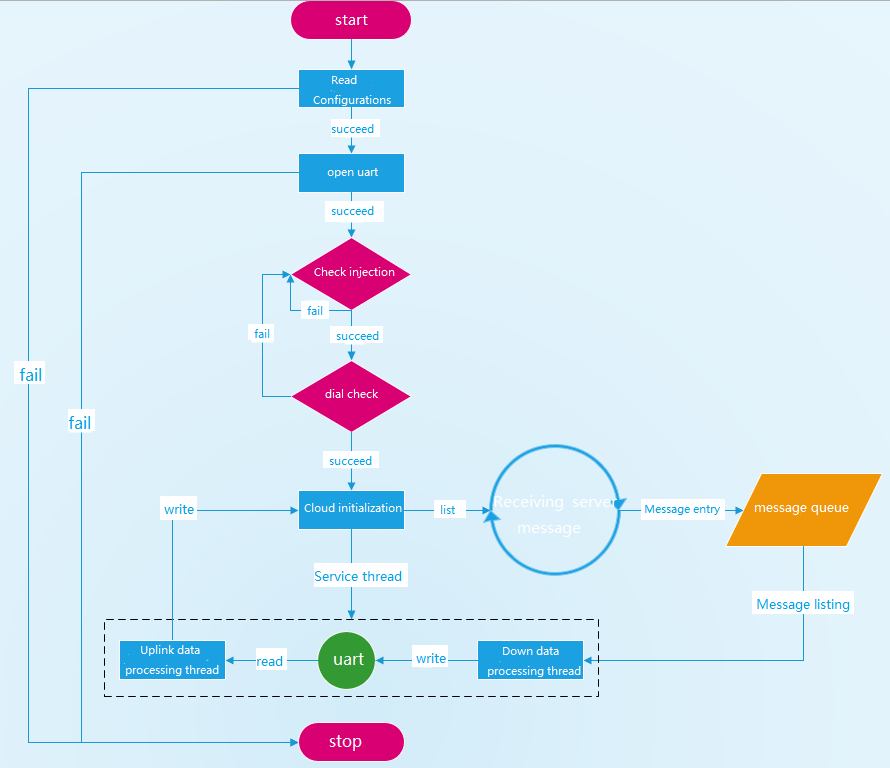
整体上业务可以总结为如下流程:
💡 基本原理:本 DTU 采用 多线程 + 消息队列 实现串口和云端数据的上下行转发。其中,上行线程(Uplink data thread)用于读取串口数据并发送至云端;下行线程(Downlink data thread)读取消息队列中的云端数据通过串口转发;消息队列用于缓存云端的下行数据。
_main.py:主脚本dtu_config.json:配置文件dtu.py:DTU 模型对象logging.py:日志模块cloud_abc.py:云对象模型抽象基类mqttIot.py:Mqtt 云对象模型实现network.py:网络serial.py:串口模型对象实现socketIot.py:Socket 云对象模型实现threading.py:线程、队列和互斥锁utils.py:工具类本方案中定义了多个对象模型,其中主要有 DTU 对象模型、云对象模型(CloudABS)和串口对象模型(Serial)。
DTU类在 dtu.py 模块中定义,主要用于初始化串行端口、云以及上下游数据服务。
实现MQTT协议的云通信功能,提供连接、订阅、发布和监控功能。云对象初始化如下:
实现TCP/UDP协议的云通信功能,提供连接、发送、接收和监听功能。socket对象初始化如下:
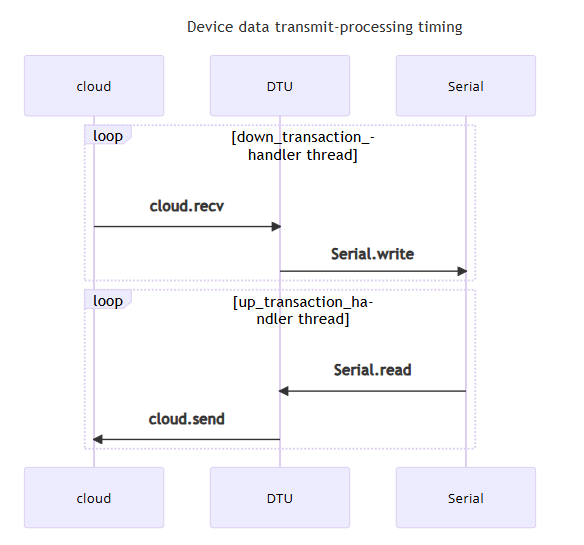
up_transaction_handler 方法:上行数据传输业务线程的入口函数。
down_transaction_handler 方法: 行数据传输业务线程的入口函数。
run方法:启动业务操作,包括基于配置文件创建串行端口和云对象,以及为上下游行业创建业务数据处理线程。
serial.py module, the serial port model class Serial is defined. This class is mainly used to implement the read and write operations of the serial port. The main interfaces include:Serial
__init__: Serial port initialization.open:Open the serial port.close:Shut down the serial port.write:Serial port write.read:Serial port read.Example of serial port::
数传业务主要在 DTU 类(dtu.py)中实现,该类主要用于管理串口、云、以及数据的上下行业务。
DTU 对象在主脚本中通过调用 run 方法来开启整个 DTU 业务,其中该方法主要用于创建并运行两个线程,分别是上行数据处理线程(线程工作函数是 up_transaction_handler)和下行数据处理线程(线程工作函数是 down_transaction_handler)。在线程函数中分别通过两个 property 属性来获取对应的串口对象和云对象。其中串口对象属性是 serial,线程在调用该属性时即刻创建并打开配置的串口对象提供读写接口。其中云对象属性是 cloud,线程在调用该属性时即刻创建并连云对象提供接收和发送接口。
函数调用时序图:
class DTU(object):
up_transaction_handler函数按照 1KB 的 buffer 读取串口数据(用户可以自行调整buffer大小),并格式化消息后通过 CloudABC.send 接口发送数据至云端。用户继承 CloudABC 并自定义云对象并实现 。
下行数据处理线程函数 down_transaction_handler 实现如下:
down_transaction_handler 函数通过调用 CloudABC.recv 来获取下行消息,并通过 Serial.write 转发消息。


